Distribution template features
-
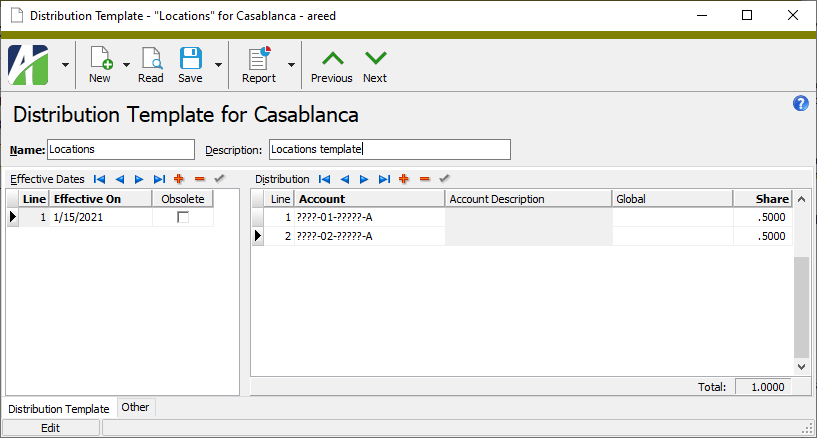
Destination accounts can be defined using wildcard masks. The wildcards are filled in by the operator when the distribution is applied during invoice entry. Using wildcards means that a single distribution template can generate distributions for many different accounts and can be used for many different vendors.
Example
In the image below, the second segment represents the company locations. This distribution distributes 50% to each of the company's two locations and could be used anytime an expense needs to be split evenly between the locations.
-
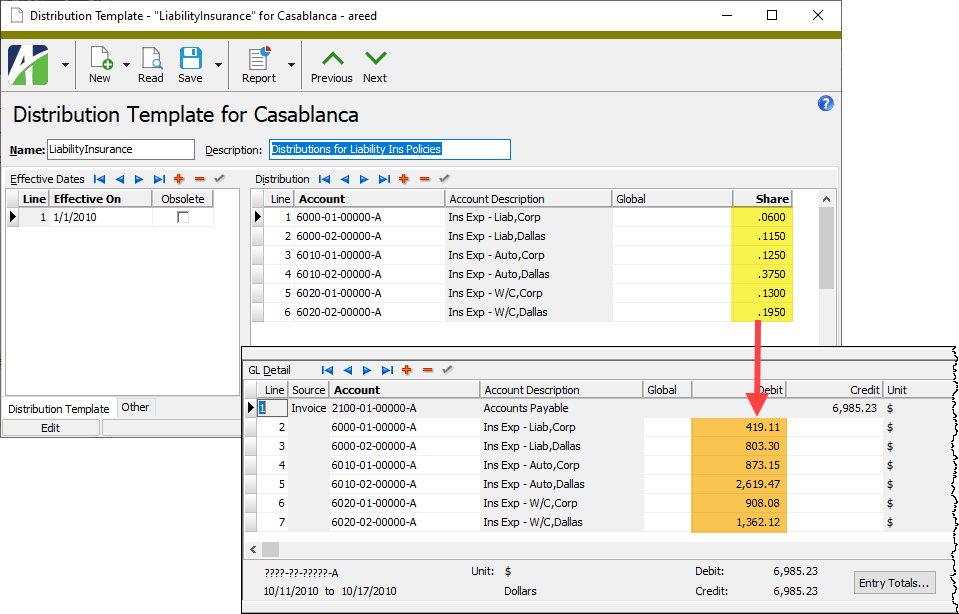
A distribution can contain different shared amounts.
Example
The distribution in the image below allocates liability insurance expense across several accounts with varying percentages to each.
-
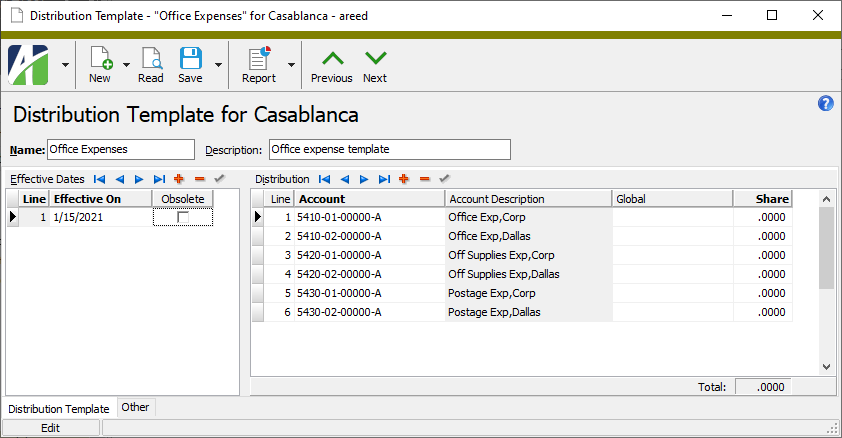
All zeros can be entered for the share ratios or percentages. This allows you to predetermine the accounts, but not the dollar amounts distributed to each account.
Example
The distribution in the image below distributes office expenses among accounts but does not specify the share to debit each account so that the dollar amount can be specified at invoice entry time.
When the template is applied on an invoice, this is the initial result before amounts are provided:

- Distribution templates allow multiple effective dates so that you can change the distribution as of a particular date. For example, if a new distribution will take effect on 01/01/2015, you could enter the new distribution in advance and assign it a 01/01/2015 effective date. The current distribution that was effective as of 01/01/2010 would be used before January 1, 2015 and then ActivityHD would switch to the new distribution. The GL date on the invoice is used to determine which effective date to apply.
- The distribution can be overridden or deleted during invoice entry.
- You can add, change, or delete GL detail lines after a template has been applied in invoice entry.
- You can apply multiple distribution templates on an invoice.
- You can create a default template with the share amount set to 100% so that the Distribution wizard automatically distributes to one predetermined account.
![]() Create a distribution template
Create a distribution template
- In the Navigation pane, highlight the Accounts Payable > Setup > Distribution Templates folder.
- Click
 . The New Distribution Template window opens.
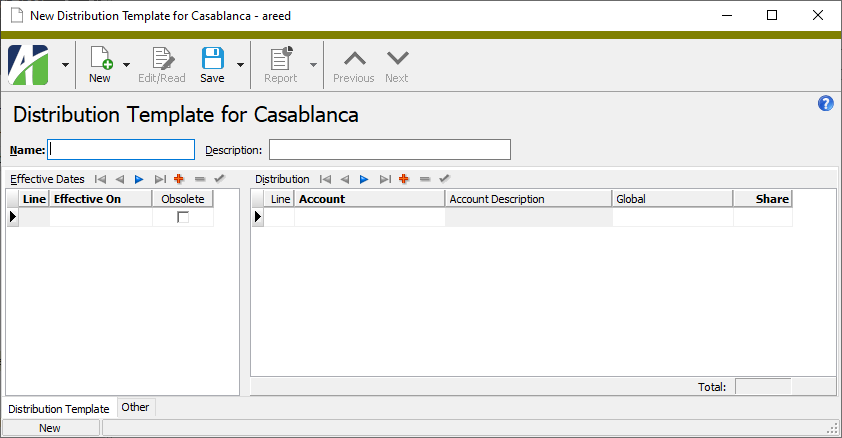
- Enter a unique Name for the distribution template.
- Enter a Description of the distribution template.
- In the Effective Dates table in the Effective On column, enter the date that the distribution you are about to enter in the Distribution table takes effect.
-
With the row you just entered in the Effective Dates table still selected, go to the first empty row of the Distribution table and enter the full or partial number of the Account to debit during invoice entry.
Note
If you leave any segments unspecified or wildcarded, you will be required to enter the appropriate segment item(s) when you apply the Distribution Template wizard. This feature allows you to define generic distribution templates that will work for multiple companies or departments (depending on the structure of your chart of accounts).
- If there are one or more active direct attributes with AP usage, a column for each of these attributes appears in the table after the Account Description. If applicable, enter the appropriate attribute items in these columns. When you apply a distribution template to an invoice, any attributes on the template distributions are copied to the new invoice lines and any account masks associated with the attribute items are applied to the GL account.
- In the Share column, enter the percent or ratio of the distribution amount to distribute to the designated account.
- Repeat steps 6-8 for any additional accounts that need to be debited.
-
Repeat steps 5-9 for any additional effective dates/distributions you need to define for the template.
Note
Define multiple effective dates if you need to change the distribution (percentage, ratio, accounts) as of certain dates.
- When you finish, save the new distribution template.
![]() Delete a distribution template
Delete a distribution template
A distribution template cannot be deleted if it is used on a vendor record.
To delete a distribution template, highlight the distribution template in the HD view and click ![]() , or open the distribution template and select
, or open the distribution template and select ![]() > Edit > Delete. In either case, ActivityHD prompts you to confirm your action. Click Delete to delete the distribution template.
> Edit > Delete. In either case, ActivityHD prompts you to confirm your action. Click Delete to delete the distribution template.
![]() Assign a distribution template to a vendor
Assign a distribution template to a vendor
You can assign a default distribution template to each vendor on the vendor's Defaults tab. This is the template that is suggested in the Apply Distribution Template dialog box when you use the Distribution wizard on invoices for the vendor. You can also assign a distribution account mask.
- In the Navigation pane, highlight the Accounts Payable > Vendors folder.
- In the HD view, locate and double-click the vendor record to open it in the Vendors window.
- Select the Defaults tab.
- From the Distribution Template drop-down list, select the distribution template to use as the default template for the vendor.
- If you want multiple distribution accounts to default on the vendor's invoices, assign a default distribution template and then enter a distribution account mask in the Distribution Acct Mask field.
- Save your changes.
![]() Apply a distribution template using the Distribution wizard
Apply a distribution template using the Distribution wizard
The procedure that follows describes how to enter an invoice from scratch using the Distribution wizard. The Distribution wizard allows you to quickly and accurately distribute to accounts. The wizard is the mechanism you use to apply a distribution template to an invoice. You can use the Distribution wizard multiple times on an invoice.
To jump to the steps expressly about the Distribution wizard, click here.
- In the Navigation pane, highlight the Accounts Payable > Invoices folder.
- Click
 . The New AP Invoice window opens.
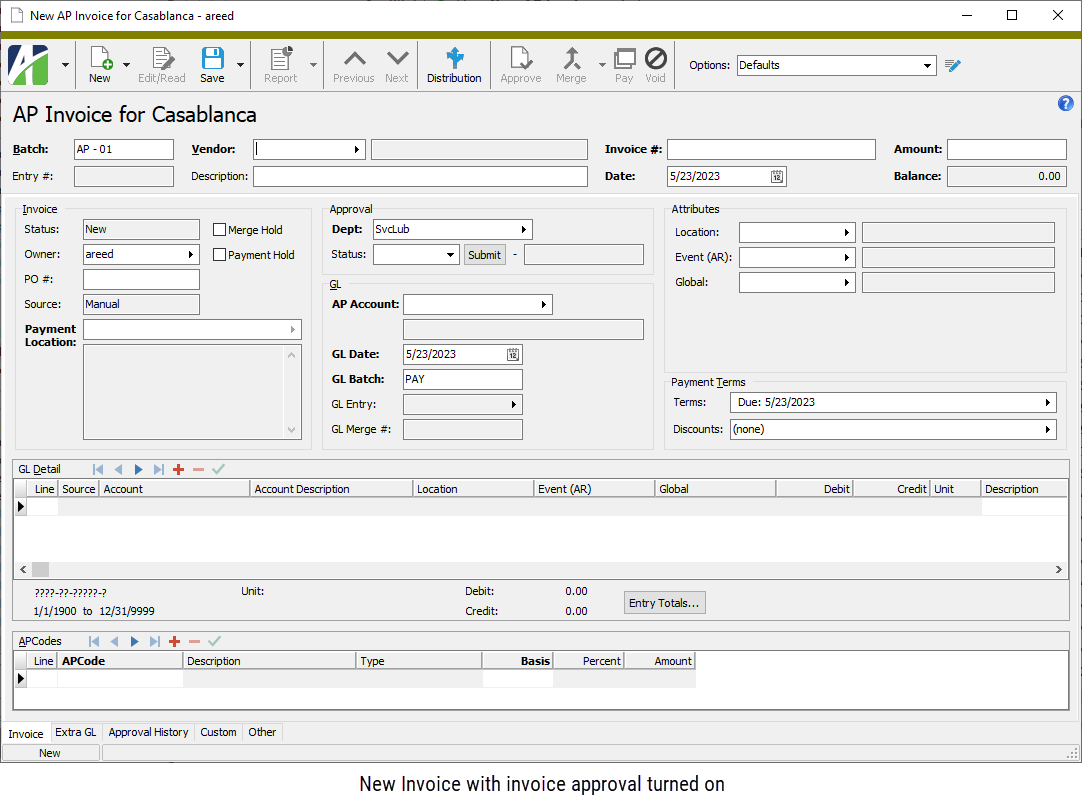
-
Enter the name of the Batch of AP invoices to include the invoice in. The default batch name is the batch from the selected options profile, or the batch from the last invoice entered if the batch name on the profile is blank.
Examples
You could use the name of the month or your initials.
- Select the Vendor you are entering the invoice for.
- Enter a Description of the invoice.
- Enter the Invoice # from the invoice document.
- Enter the invoice Date.
- Enter the total Amount of the invoice including tax, freight charges, handling charges, and all other items billed on the invoice before any discounts are applied. Negative amounts can be entered. You can distribute the extra expenses to the appropriate GL accounts in the GL Detail table.
- If the Purchasing package is installed, the Owner field is visible in the Invoice section. Select the purchasing operator responsible for the invoice.
- Enter the PO # associated with the invoice. This field is optional unless the vendor is set up to require a purchase order number.
- If you need to prevent the invoice from being merged temporarily, mark the Merge Hold checkbox. This option is useful if the invoice needs further attention before it is processed.
- If you need to withhold payment on this invoice temporarily, mark the Payment Hold checkbox. Invoices on payment hold cannot be paid in the group pay process; however, they can be paid individually although ActivityHD does issue a warning.
- In the Payment Location field, select the vendor payment location for this invoice. This field defaults to the vendor's default payment location.
- If invoice approval is enabled, the Approval section is visible. In the Dept field, select the purchasing department responsible for invoice approval.
- In the AP Account field, enter the liability account to credit for the invoice. The account number defaults from the liability account specified on the vendor's record or from the default on the vendor in conjunction with the account mask from the invoice options.
- In the GL Date field, enter the date to record the detail postings for the invoice. The default date is the invoice date or the date specified in the invoice options.
- Enter the name of the GL Batch to include the invoice in when it is merged. The default GL batch name is the GL batch from the selected options profile, or the GL batch from the last invoice entered if the GL batch name on the profile is blank.
-
In the Attribute field(s), enter the appropriate attribute value(s) for the invoice. In particular, be sure to enter values for required attributes. If default attribute items are defined on the vendor record, they are copied to these fields. You can override or blank out the default attribute items as needed.
Invoice-level attributes are automatically applied to the detail distribution lines but can be overridden if the attribute is configured for invoice detail usage. Account mask requirements for the liability and debit accounts can be specified on attribute items.
Note
If an attribute is flagged for "Use on GL Detail" and to "Follow Calendar Post Control" and to "Post to GL" for AP and the invoice is merged and the corresponding GL journal entry (for the invoice or the extra GL detail line) is merged and the post control is "Error", the attribute item on an invoice cannot be changed. If those conditions exist but the post control is "Warning", a message is displayed before the attribute item can be changed.
The post control in effect is determined as follows:
- If there is a segment-specific control calendar on the GL account from the GL detail or extra GL line, use the control calendar. Otherwise, use the default calendar.
- Open the calendar period that contains the posting date from the GL detail or extra GL line. If there is an AP-specific post control for the period, use it.
- If the period of the posting date is outside the periods before or the periods after the current period, use the post control on the calendar.
- To enter payment terms for the invoice, click in the Terms field. The Invoice Payment Terms dialog opens. To skip payment terms, skip to step 25.
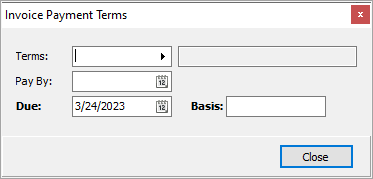
- In the Terms field, select the payment terms for the invoice. The default terms come from the vendor record. The discount date, due date, and basis are calculated based upon the payment terms and invoice date.
- In the Pay By field, enter the date by which to pay the invoice.
- The date the payment is Due is calculated from the payment terms. If you need to override the date, enter the actual due date.
- The Basis field defaults to an amount calculated based on the invoice amount and payment terms. If the amount subject to discount is different, enter the actual discount basis amount.
- Click Close.
- To enter discount information for the invoice, click in the Discounts field. The Invoice Discount Dates dialog opens. If no discount applies, skip to step 28.
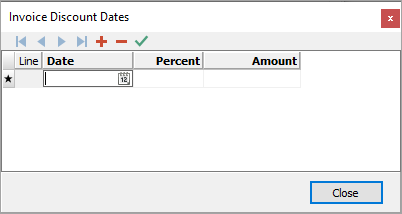
- The information in the Discount Dates table defaults from the payment terms. If the payment terms did not include discount information or if you need to override the information in the table, do the following for each discount date:
- In the Date field, enter the latest date that a payment can be received on the invoice in order to receive the discount shown in this row.
- If you know the discount rate, enter the rate in the Percent field; the Amount is calculated for you. If you know the Amount of the discount, enter it; the Percent is calculated for you.
- When you finish, click Close.
-
Next, turn your attention to the GL Detail table.
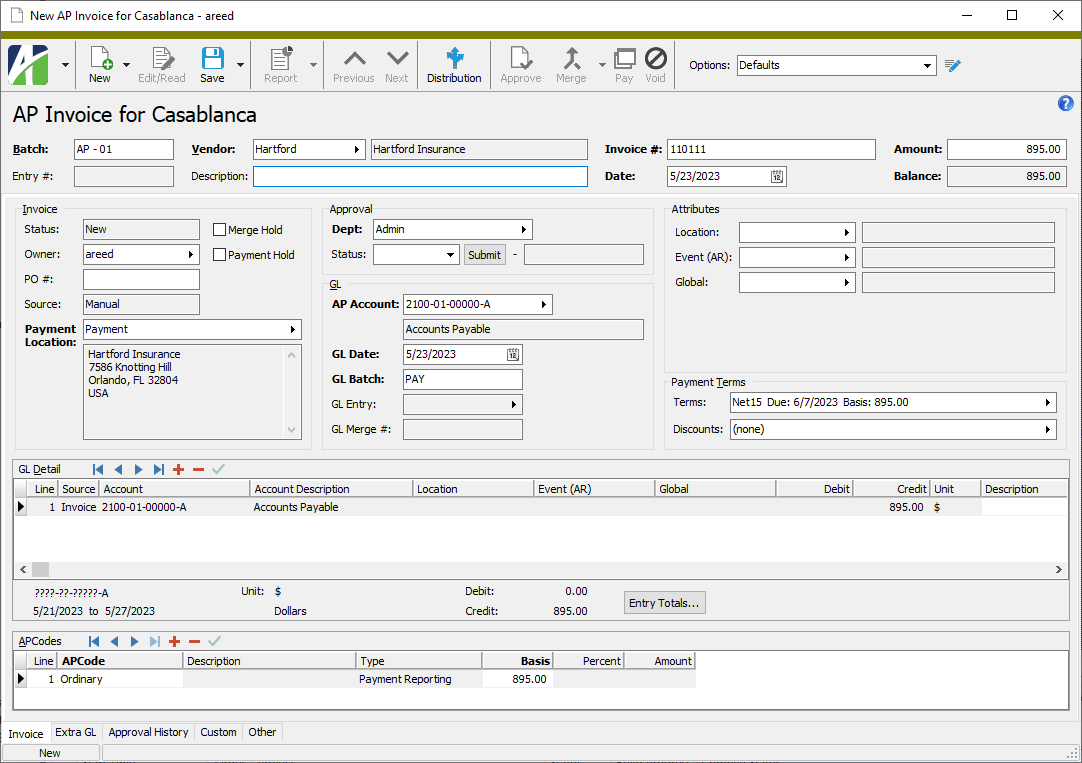
Notice in the GL Detail table that ActivityHD automatically creates a detail line with a source of "Invoice" to credit the AP liability account for the invoice. Moreover, if the purchase is subject to use tax, the use tax is calculated based on the APCode specified in the APCodes table and a detail line is added to the GL Detail table. Neither of these lines can be edited directly.
- Because some entries in the APCodes table may affect the distribution amount, first examine the APCodes table to determine if you need to add, remove, or change any rows.
- To add a row, start with your cursor in the APCodes table and click
 . In the APCode column, select the APCode to add. The value in the Basis column defaults to the invoice basis amount. If you need to change the basis, enter the amount of the invoice that is subject to the APCode.
 - To remove a row, start with your cursor in the row you need to remove and click
 . ActivityHD prompts you to confirm the action. Click OK.
 - To change a row, go into that row and select a new APCode and/or change the Basis amount as needed.
- To add a row, start with your cursor in the APCodes table and click
- Use the Distribution wizard to apply a distribution template.
- Click
 . The Apply Distribution Template dialog box opens.
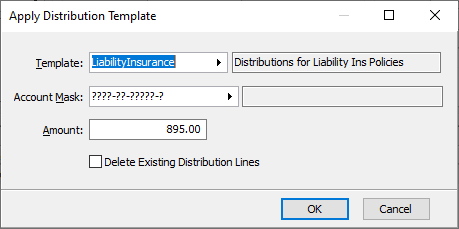
- In the Template field, select the distribution template to use for the distribution. The default template is the template designated on the vendor record.
- The Account Mask field shows the combination of the account mask on the distribution template and the account mask specified on the vendor record (if applicable). If there are blanks remaining in the account mask, fill them with wildcards or actual segment item codes.
- The Amount field defaults to the undistributed amount. Enter the amount to distribute to the designated account mask.
- If you want to remove existing GL detail lines from the distribution before applying the distribution template, mark the Delete Existing Distribution Lines checkbox.
- Click OK.
- Repeat these steps, if necessary, until you distribute the entire amount.
- Click
- When you finish, save the new invoice.
![]() Flag a distribution for a particular effective date as obsolete
Flag a distribution for a particular effective date as obsolete
When the distribution associated with a particular effective date is no longer in use, you can flag the effective date as obsolete. If you attempt to use a distribution template on an invoice with a GL date that falls in an effective date range that is obsolete, ActivityHD warns you and you will be unable to use the template.
- In the Navigation pane, highlight the Accounts Payable > Setup > Distribution Templates folder.
- In the HD view, locate and double-click the distribution template that contains the distribution you need to flag as obsolete. The Distribution Template window opens.
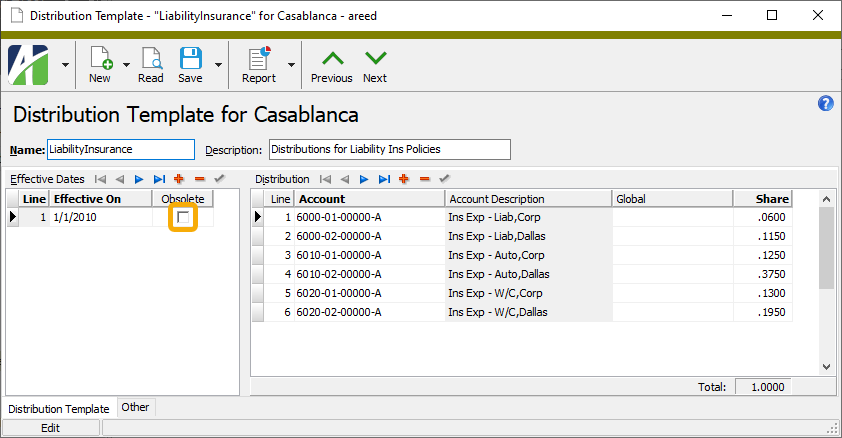
- In the Effective Dates table, select the row in the table that corresponds to the distribution you need to flag as obsolete.
- Mark the Obsolete checkbox.
- If you need to add a new distribution to replace the one you flagged as obsolete, add a new row to the Effective Dates table, enter an effective date, and enter the distribution accounts and shares in the Distribution table.
- When you finish, save your changes.
Purpose
The Distribution Templates Listing provides a list of the distribution templates defined in Accounts Payable.
Content
For each distribution template included on the report, the listing shows:
- description.
In addition, you can include one or more of the following:
- effective date detail (effective date, obsolete flag, distribution lines, total share)
- detail attributes
- timestamps
- memos
- custom fields.
If you include effective date detail, the report shows the following information for each distribution line:
- line number
- account number
- account description
- share
- percentage.
The following total appears on the report:
- record count.
Print the report
- In the Navigation pane, highlight the Accounts Payable > Setup > Distribution Templates folder.
- Start the report set-up wizard.
- To report on all or a filtered subset of distribution templates:
- Right-click the Distribution Templates folder and select Select and Report > Distribution Templates Listing from the shortcut menu.
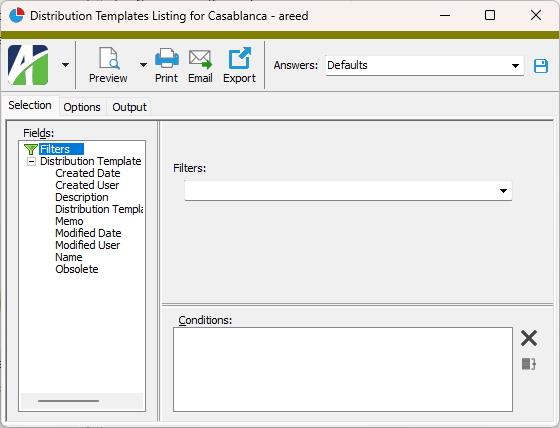
- On the Selection tab, define any filters to apply to the data.
- To report on specifically selected distribution templates:
- In the HD view, select the distribution templates to include on the report. You can use Ctrl and/or Shift selection to select multiple records.
- Click
 .
.
- To report on a particular distribution template from the Distribution Template window:
- In the HD view, locate and double-click the distribution template to report on. The Distribution Template window opens with the distribution template loaded.
- Click
 .
.
- To report on all or a filtered subset of distribution templates:
- Select the Options tab.
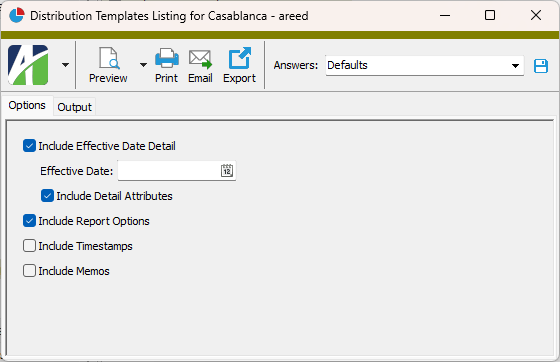
- Mark the checkbox(es) for the additional information to include:
- Effective Date Detail - If you mark this checkbox, the Effective Date field and the Include Detail Attributes checkbox are enabled. In the Effective Date field, enter the date to test to determine which detail is included on the report.
- Detail Attributes
- Report Options. To include a section at the end of the report with the report settings used to produce the report, leave the checkbox marked. To produce the report without this information, clear the checkbox.
- Timestamps
- Memos
- Custom Fields (only visible if custom fields are set up)
- Effective Date Detail - If you mark this checkbox, the Effective Date field and the Include Detail Attributes checkbox are enabled. In the Effective Date field, enter the date to test to determine which detail is included on the report.
- Select the Output tab.
- In the Design field, look up and select the report design to use.
- In the toolbar, click the icon for the type of output you want:
 - Provides access to two preview options.
- Preview - Click the icon or click the drop-down arrow and select Preview from the drop-down menu to view the report in the Crystal Reports viewer.
- Preview to PDF - Click the drop-down arrow next to the icon and select Preview to PDF to view the report in the PDF reader.
 - Opens the Print dialog so that you can select and configure a printer and then print a paper copy of the report.
 - Opens the Report Email dialog so that you can address and compose an email that the report will be attached to. For best results, ensure your email client is running before you attempt to send a report via email.
 - Opens the Export Report dialog so that you can save the report to a file. File types include Crystal Reports (.rpt), PDF (.pdf), Microsoft Excel (.xls), Microsoft Word (.doc), rich text (.rtf), and XML (.xml).
Data extensions
The following data extensions are available for the report:
- Distribution templates
- Distribution template date
- Distribution template detail
Distribution Template Record ID
Distribution Template tab
The full or partial GL account number to debit during invoice entry.
Note
If any segments are left undefined or wildcarded, ActivityHD will prompt for them when you run the Distribution Template wizard. This feature allows you to define generic distribution templates that will work for multiple companies or departments (depending on the structure of your chart of accounts).
Press F2 to open the Account Expand dialog box where you can look up an account number, find an account number by its alias, build the account number by segment, or view setup and setup sources.
Press F3 to look up the account.
If an account is already selected, you can press F4 to open the record in the Account window.
Custom tab
This tab is visible if custom fields exist for the entity. At a minimum, if there are custom fields, a Fields subtab will be present. One or more additional categories of subtabs may also be visible.
Fields subtab
This tab prompts for values for any custom fields set up for entity records of this entity type. Respond to the prompts as appropriate.
References subtab
This tab is visible if other records reference the current record.
Example
Suppose a custom field exists on PRCodes that references an ARCode. On the ARCode record, on the Custom > References subtab, you can view all the PRCodes which reference that ARCode.
Exchange Folder subtab
This tab is visible only if you set up a custom field with a data type of "Exchange Folder". The label on this tab is the name assigned to the custom field.
This tab shows the contents of the specified Exchange folder.
File subtab
This tab is visible only if you set up a custom field with a data type of "File". The label on the tab is the name assigned to the custom field.
This tab renders the contents of the specified file according to its file type.
Internet Address subtab
This tab is visible only if you set up a custom field with a data type of "Internet Address". The label on this tab is the name assigned to the custom field.
This tab shows the contents of the specified web page.
Network Folder subtab
This tab is visible only if you set up a custom field with a data type of "Network Folder". The label on this tab is the name assigned to the custom field.
This tab shows the contents of the specified network folder.
Attachments tab
The Attachments tab is visible if any record for a given entity has an attachment. If the Attachments tab is not visible, this implies that no record of the entity type has an attachment on it; however, once an attachment is added to any record of the entity type, the Attachments tab will become available.
Other tab
Distribution templates security
Common accesses available on distribution templates
| Access | A user with this access can... |
|---|---|
| Change | Use the mass change action on distribution templates. |
| Custom Fields | Create and edit custom fields for distribution templates. |
| Data | Have read-only access to distribution templates from anywhere in the software (e.g., field validations, filters, date expressions). |
| Delete | Delete distribution templates. |
| Edit | Edit distribution template records. |
| Export | Export distribution template records from ActivityHD. |
| Import | Import distribution template records into ActivityHD. |
| New | Create new distribution template records. |
| Read | Have read-only access to distribution template records. |
| Report | Run reports with distribution template information. |
| Report Designs | Create and edit report designs with distribution template information. This access enables the Report Designs button on the Output tab of report dialogs. |
| Shared Answers | Create and edit action profiles and report profiles related to distribution templates. |
| Shared Filters | Create and edit shared filters on distribution templates. |
| Visible | View the Distribution Templates folder in the Navigation pane. |
Report Email dialog
- Windows user default account. Sends email using the user's Windows default email account. For most users, this is the account configured in Outlook or another email client application.
- Server personal. Sends email using the email configuration for the system or company server and the email address on the current user's authorized user record. The authorized user record must have a confirmed email address.
- Server generic. Sends email using the email configuration and "from" address for the system or company server. This option requires "Send generic" access to the Server Email resource.
|
5225 S Loop 289, #207 Lubbock, TX 79424 806.687.8500 | 800.354.7152 |
© 2025 AccountingWare, LLC All rights reserved. |